- Flask
- AWS ECS
- Fargate
- NGINX
- Docker
How to Deploy a Flask Application Using NGINX on AWS ECS — Part 1
Build a Flask application and package it with Gunicorn and NGINX containers in the first part of this hands-on AWS ECS series.
Deploying a Flask application using NGINX on AWS ECS might seem too complex at first, but this article is the ultimate guide to help you through all the steps.
Let’s start by defining some fundamental concepts:
Flask is a popular web framework for building web applications in Python. It is a lightweight framework that provides valuable tools and features for building web applications, such as routing, request handling, and template rendering.
NGINX is a web server often used as a reverse proxy, load balancer, and HTTP cache.
Amazon Elastic Container Service (ECS) is a fully-managed container orchestration service provided by Amazon Web Services (AWS). It allows developers to deploy, manage, and scale containerized applications on AWS quickly. With ECS, developers can run and manage Docker containers on a cluster of Amazon EC2 instances, making it easy to build, ship, and run distributed applications.
Our goal:
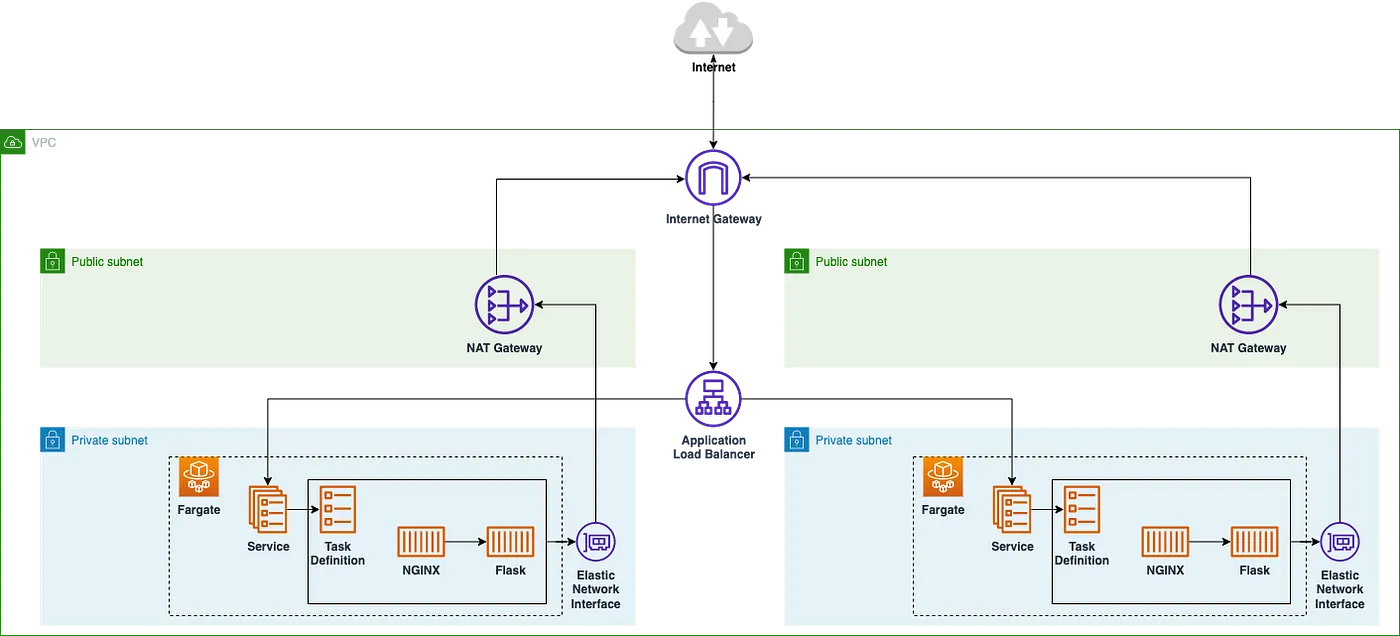
The image above shows the AWS Architecture diagram where we have both containers NGINX + FLASK defined within the Task Definition running as a Service inside an AWS Fargate Cluster. Our application will be running inside two private subnets withoutdirect access from the Internet; in this case, it will be our Application Load Balancer redirecting HTTP traffic to our application.
The Elastic Network Interface willallow our service to communicate with other resources in the AWS cloud, such as AWS ECR, over a virtual private network (VPN) or the internet.
To understand more about these concepts, please read the following blog post: https://start.jcolemorrison.com/aws-vpc-core-concepts-analogy-guide/
Steps:
-
Create the Flask application
-
Create the Docker image for the Flask application
-
Configure & Create the Docker image for NGINX
-
Create the Flask application
Initialize the project with the following commands in your terminal:
mkdir projectmkdir applicationcd applicationpython3 -m venv venvsource venv/bin/activate
Install Flask by running the following:
pip install flask
Create a subfolder in the application folder and name it app — , and another file in the app folder, named **init.py** :
mkdir appcd apptouch __init__.py
Paste the following code inside the **init.py** file:
from flask import Flaskapp = Flask(__name__)from app import routes
Create a new file called routes.py in the app folder, and paste the following code in the routes.py file:
from app import [email protected]('/')@app.route('/index')def index(): return "Hello from my AWS ECS Container"
Now back to the application folder, create a file named start.py with the following code inside:
from app import app
Let’s install Gunicorn:
pip install gunicorn
And to complete this step, create the requirements.txt file by running the following command inside the application folder.
pip freeze > requirements.txt
Your folder structure should look like this:
project/ application/ venv/ app/ __init__.py routes.py start.py requirements.txt
- Create the Docker image for the Flask application
Create a file named Dockerfile in the application folder with the following code:
FROM python:slimRUN useradd projectWORKDIR /home/projectCOPY requirements.txt requirements.txtRUN pip install -r requirements.txtCOPY app appCOPY start.py ./ENV FLASK_APP start.pyRUN chown -R project:project ./USER projectEXPOSE 5000CMD [ "gunicorn", "-b", ":5000", "--access-logfile", "-", "start:app"]
Now let’s build the image by running the following:
docker build -t project:latest .
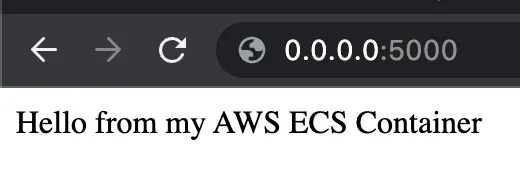
Run a test to check if it is working correctly by starting the container, executing the following command, and then accessing it using your browser http://0.0.0.0.5000 :
docker run -d -p 5000:5000 --name project project
By now, you should be seeing this:
- Configure & Create the Docker image for NGINX
Create a subfolder called nginx in the project folder and then inside create a file called nginx.conf:
cd projectmkdir nginxtouch nginx.conf
Paste the following code inside the nginx.conf file:
user nginx;worker_processes 1;error_log /var/log/nginx/error.log warn;pid /var/run/nginx.pid;events { worker_connections 1024;}http { include /etc/nginx/mime.types; default_type application/octet-stream; log_format main '$remote_addr - $remote_user [$time_local] "$request" ' '$status $body_bytes_sent "$http_referer" ' '"$http_user_agent" "$http_x_forwarded_for"'; access_log /var/log/nginx/access.log main; sendfile on; keepalive_timeout 65; server { listen 80; location / { proxy_pass http://127.0.0.1:5000; proxy_redirect off; proxy_set_header Host $host:$server_port; proxy_set_header X-Real-IP $remote_addr; proxy_set_header X-Forwarded-For $proxy_add_x_forwarded_for; proxy_set_header X-Forwarded-Host $server_name; } }}
Note: Between the server brackets, we have the location block where we are redirecting requests coming to / directly to our application on http://127.0.0.1:5000
Create a file named Dockerfile in the nginx folderwith the following code:
FROM nginx:stableCOPY ./nginx.conf /etc/nginx/nginx.conf
Now let’s build the image by running the following:
docker build -t nginx:latest .
In Part 2, we will push our built images to AWS ECR and create our VPC network with the necessary components.
Stay tuned!
You can find this code also on my Github: https://github.com/filipegalo/flask-nginx/
And if you enjoy my content or if you have any questions, feel free to connect with me on Twitter: https://twitter.com/AutomationForge